
Must-Try No Bake Pie Recipes: Easy & Delicious Treats
Why Choose No-Bake Pies?
No-bake pies have many good points that make them a favorite dessert. For instance, here are some reasons:
- No Oven Needed: This is the clearest benefit! You keep your kitchen cool, especially when it’s hot outside.
- Quick to Prepare: Most no-bake pie fillings are ready in just a few minutes. The main time needed, therefore, is for chilling.
- Simple Ingredients: Often, they use basic items you likely have, like pre-made crusts, pudding mixes, cream cheese, and whipped topping.
- Great for Beginners: The steps are usually very easy. This makes them perfect for people new to baking.
- Easy to Make Ahead: No-bake pies need time to chill. Because of this, they are ideal to prepare hours or even a day before you need them.
Now, let’s look at these delicious recipes!
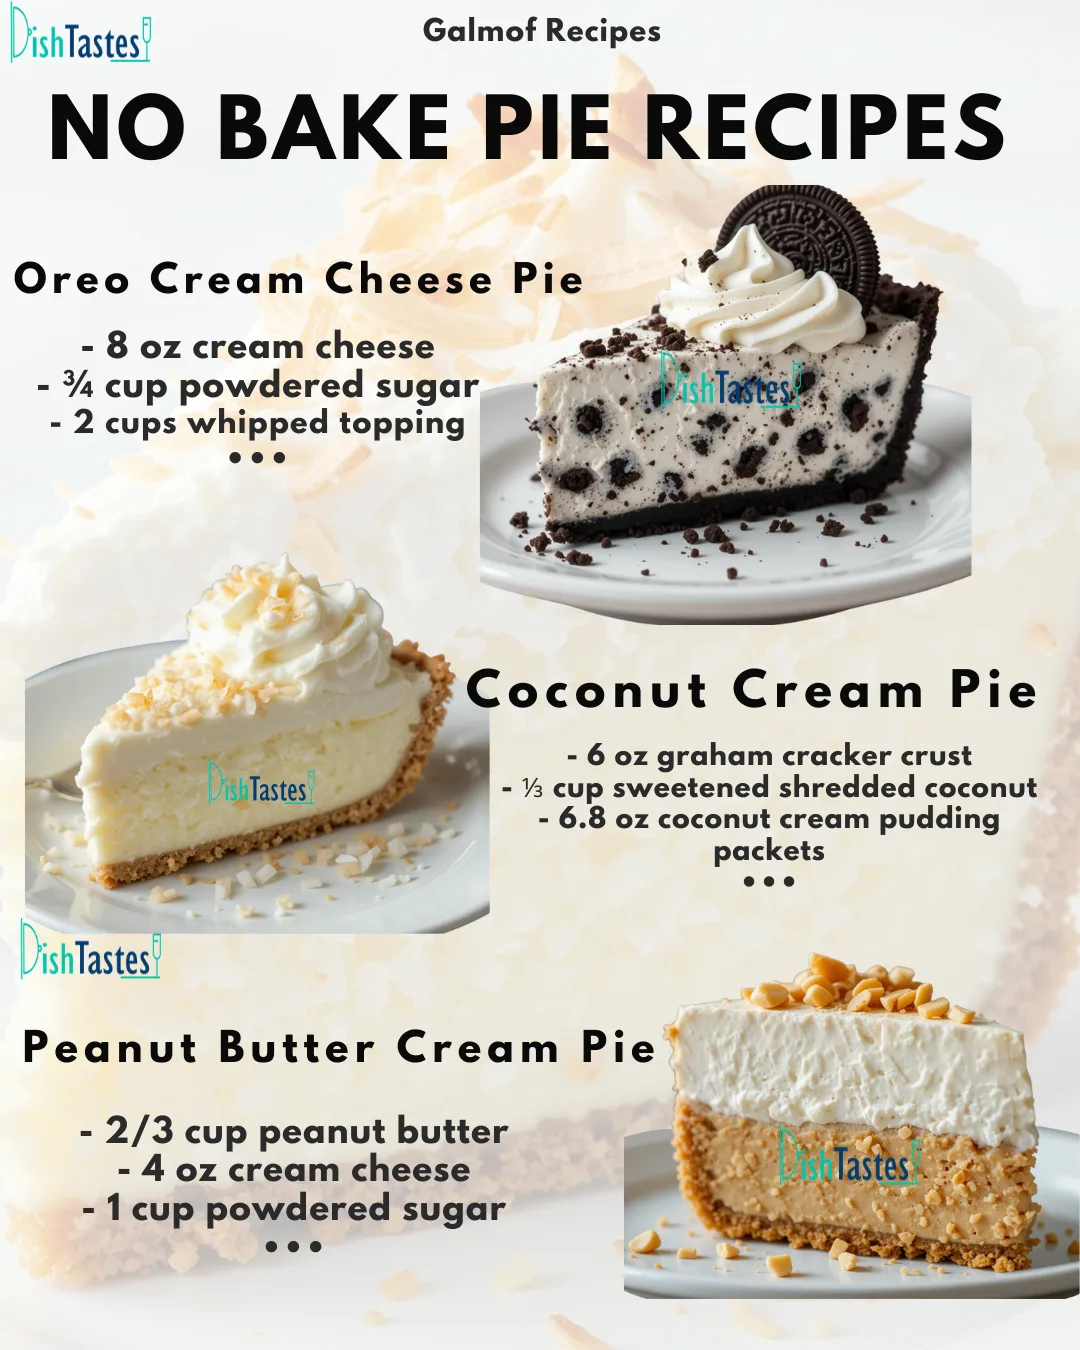
1. No Bake Oreo Pie
This pie is perfect for anyone who loves Oreos! It has a homemade Oreo cookie crust and a smooth filling full of crushed Oreos. It’s simple, rich, and always a hit.
Yields: 8-10 servings
Prep time: 20 minutes
Chill time: At least 4 hours (or overnight)
Total time: Approximately 4 hours 20 minutes (includes chilling)
Description
A rich and creamy no-bake pie with a press-in Oreo cookie crust. The filling is a smooth mix of cream cheese and whipped topping with chopped Oreo cookies inside.
Equipment
- Food processor (or zip-top bag and rolling pin)
- Medium bowl
- 9-inch pie dish
- Large mixing bowl
- Electric mixer (handheld or stand)
- Spatula
Ingredients
Oreo Cookie Crust:
- 25 crushed Oreo cookies (about 2 cups of crumbs)
- 5 tbsp unsalted butter, melted
Oreo Pie Filling:
- 8 oz cream cheese, softened
- ¾ cup powdered sugar
- 2 cups whipped topping (like Cool Whip), thawed if frozen
- 10 Oreo cookies, roughly chopped
Optional Garnish:
- Whipped cream
- 8 whole Oreo cookies
Instructions
- Make the Crust: Crush 25 Oreo cookies. You can do this in a food processor until they are fine crumbs. Alternatively, put them in a zip-top bag and crush them with a rolling pin.
- In a medium bowl, mix the crushed Oreos with the 5 tablespoons of melted unsalted butter. Stir until the crumbs are well combined and look like wet sand.
- Press the mixture firmly and evenly into the bottom and up the sides of a 9-inch pie dish. This forms the crust. You can use the bottom of a glass or a measuring cup to help press it down firmly.
- Make the Filling: In a large bowl, use an electric mixer to beat the 8 ounces of softened cream cheese and ¾ cup of powdered sugar. Beat until the mixture is smooth and creamy.
- Gently fold in the 2 cups of whipped topping using a spatula. Mix until it is well combined and you don’t see streaks of whipped topping. Be careful not to mix too much, as this can make the whipped topping flat.
- Gently fold in the 10 roughly chopped Oreo cookies. Make sure they are spread evenly through the filling.
- Spread the filling evenly into the prepared Oreo cookie crust. Smooth the top with a spatula.
- Chill: Put the pie in the refrigerator for at least 4 hours so it can set completely. For best results and easier slicing, chilling it overnight is recommended.
- Garnish and Serve: Before serving, you can add whipped cream and whole Oreo cookies on top if you like. Then, slice and enjoy!
Tips and Variations for Oreo Pie
Here are some tips to make your Oreo pie perfect:
- Crush Finely: Make sure the Oreo crumbs for the crust are very fine. This helps the butter hold them together well.
- Press Firmly: Pressing the crust firmly into the pan is important. It stops the crust from falling apart when you slice the pie.
- Soften Cream Cheese: Be sure your cream cheese is soft at room temperature. This helps avoid lumps in the filling.
- Whipped Topping: Use a stable whipped topping like Cool Whip. If you make your own whipped cream, add a little gelatin or cornstarch to make it firmer.
- Add Chocolate: You can add more chocolate flavor. For example, drizzle the finished pie with Ultimate Chocolate Sauce or melted chocolate before chilling or serving.
- Mint Oreo: For a different taste, use mint Oreos instead of regular ones.
- Different Crust: The Oreo crust is great, but you could also use a graham cracker crust or a chocolate graham cracker crust.
You can find more details about this specific recipe here: No Bake Oreo Pie.
2. No Bake Coconut Cream Pie
Take a trip to a tropical place with each bite of this creamy pie! It tastes like coconut, and moreover, it is light and refreshing. It’s full of coconut flavor.
Yields: 8-10 servings
Prep time: 15 minutes
Chill time: At least 4 hours (or overnight)
Total time: Approximately 4 hours 15 minutes (includes chilling)
Description
An easy no-bake pie with a graham cracker crust. The filling is a creamy mix of coconut pudding and whipped topping. It’s finished with more whipped topping and toasted coconut.
Equipment
- Skillet (for toasting coconut)
- Medium bowl
- Whisk
- Spatula
- 9-inch pie dish (if using a loose crust)
Ingredients
- 1 (6 oz) graham cracker crust (store-bought or homemade)
- ⅓ cup sweetened shredded coconut, plus more for topping
- 2 (3.4 oz) packets coconut cream instant pudding mix
- 2 cups cold whole milk
- 1½ tsp coconut extract
- 1 (8 oz) container Cool Whip, thawed if frozen
Instructions
- Toast Coconut: Toast the ⅓ cup of sweetened shredded coconut in a dry skillet over medium heat. Stir often until it becomes golden brown and smells good. Watch it carefully because it can burn fast. Take it out of the skillet and let it cool completely.
- Make Pudding: In a medium bowl, whisk together the 2 packets of coconut cream instant pudding mix, 2 cups of cold whole milk, and 1½ teaspoons of coconut extract. Whisk for 2 minutes until the pudding starts to get thick.
- Fold in Whipped Topping: Gently fold in half (about 4 oz) of the thawed Cool Whip into the pudding mix using a spatula. Mix until there are no streaks left.
- Fill the Crust: Pour the filling into the graham cracker crust and spread it out evenly.
- Chill: Put the pie in the refrigerator for at least 4 hours or overnight. This lets the pie set completely.
- Garnish and Serve: Before serving, spread the remaining half (about 4 oz) of the Cool Whip evenly over the top of the pie. Sprinkle the cooled toasted coconut over the whipped topping. Then, slice and enjoy!
Tips and Variations for Coconut Pie
Here are some tips for your coconut pie:
- Toasting Coconut: Toasted coconut adds a deeper taste and lovely crunch. Be sure to do this step!
- Cold Milk: Using cold milk helps the instant pudding set correctly and quickly.
- Pudding Mix: Make sure you use instant pudding mix, not cook-and-serve. If you can’t find coconut cream mix, you can use vanilla pudding mix and add more coconut extract. However, the coconut flavor will be less strong.
- Homemade Whipped Cream: For a richer pie, use stabilized homemade whipped cream instead of Cool Whip.
- Add Texture: You can add some chopped macadamia nuts or white chocolate chips to the filling for extra texture.
- Different Crust: A shortbread crust or even an Oreo crust can be interesting options instead of the graham cracker crust.
3. No Bake Peanut Butter Pie
If you love peanut butter, this pie is for you! This very easy and creamy pie has lots of peanut butter flavor. Also, it has a wonderfully smooth texture.
Yields: 8-10 servings
Prep time: 15 minutes
Chill time: At least 4 hours (in two stages)
Total time: Approximately 4 hours 15 minutes (includes chilling)
Description
A creamy no-bake pie with a rich peanut butter and cream cheese filling. It sets in a graham cracker crust. It’s topped with whipped topping and roasted peanuts if you like.
Equipment
- Medium bowl
- Electric mixer (handheld or stand)
- Spatula
- 9-inch pie dish (if using a loose crust)
Ingredients
- ⅔ cup creamy peanut butter
- 4 oz cream cheese, softened
- 1 cup powdered sugar
- ½ cup milk
- 1 (6 oz) graham cracker crust (store-bought or homemade)
- 1 (8 oz) container Cool Whip, thawed if frozen
- Roasted peanuts, chopped (optional, for garnish)
Instructions
- Make the Filling Base: In a medium bowl, use an electric mixer to beat together the ⅔ cup of creamy peanut butter and 4 ounces of softened cream cheese. Beat until the mixture is smooth and well combined.
- Add the 1 cup of powdered sugar and mix well until everything is mixed together.
- Gradually add the ½ cup of milk while mixing on low speed. Keep mixing until the filling is smooth and creamy.
- Fill the Crust: Pour the filling into the graham cracker crust and spread it out evenly.
- Initial Chill: Put the pie in the refrigerator for at least 2 hours. This lets the filling start to set.
- Add Topping: Top the partially set pie with the thawed Cool Whip. Spread it evenly over the peanut butter filling.
- Final Chill: You can add chopped roasted peanuts on top if you want. Chill the pie for at least 2 more hours (so at least 4 hours total chilling time) before slicing and serving. This makes sure it is fully set.
Tips and Variations for Peanut Butter Pie
Here are some tips for your peanut butter pie:
- Peanut Butter: Use creamy peanut butter for the smoothest texture. Natural peanut butter can separate. If you use it, stir it very well first.
- Soften Cream Cheese: Make sure the cream cheese is fully soft at room temperature. This helps prevent lumps.
- Add Milk Slowly: Add the milk a little at a time. This helps the filling mix well and become smooth.
- Add Chocolate: You can add chocolate! For instance, swirl in some melted chocolate or Ultimate Chocolate Sauce into the filling. Or drizzle it over the top. Also, add chopped peanut butter cups or chocolate chips. This makes a tasty peanut butter chocolate pie! (See our Reeses Chocolate Peanut Butter Cup Cheesecake for ideas).
- Different Crust: A chocolate graham cracker crust or an Oreo crust would taste great with the peanut butter filling.
- Crunchy Texture: Use crunchy peanut butter or add chopped roasted peanuts or peanut butter cups to the filling. This adds a nice crunch.
General Tips for Perfect No-Bake Pies
Remember these tips for making any no-bake pie:
- Chill Time is Important: Do not make the chilling time shorter than recommended. This lets the filling set correctly. It makes the pie easier to slice and gives it the right texture.
- Stable Whipped Topping: Use a whipped topping that holds its shape well, like Cool Whip. Or, make homemade whipped cream and add something to make it firmer, like gelatin or cornstarch. This stops it from getting watery.
- Clean Slices: To get clean slices, use a sharp knife. Dip it in hot water and wipe it dry before each cut.
- Crust Options: Graham cracker and Oreo crusts are common. But you can also use shortbread, gingersnap, or even pretzel crusts for different tastes.
Storage
Store all three pies in the refrigerator. Cover them loosely with plastic wrap or use a pie carrier that seals well. They will stay good for up to 3-4 days. The crust might get a little soft over time.
Frequently Asked Questions (FAQs)
- Can I freeze no-bake pies?Most no-bake pies, especially those with cream cheese or pudding, freeze well. Let the cooled pie freeze. Wrap it tightly in plastic wrap, then in aluminum foil. Or, put it in a container that is safe for the freezer. Freeze for up to 1-2 months. Thaw it in the refrigerator overnight before serving. Keep in mind that the texture might change a bit after freezing and thawing.
- How long do no-bake pies last in the refrigerator?Usually, no-bake pies are best to eat within 3-4 days. Make sure they are stored correctly in the refrigerator.
- Can I make a homemade crust?Yes, you can make your own graham cracker or cookie crusts. A common way is to mix 1½ cups of crumbs with ¼ cup melted butter and 2-4 tablespoons of sugar. Then, press this mix into the pie pan.
- Can I change ingredients in the filling?Changing ingredients can sometimes work. However, it might change how the pie sets. For example, using different types of milk or lower-fat dairy might make the pie less firm. For the best results, follow the recipe exactly. Only make changes if you have experience doing so.
- My no-bake pie filling didn’t set. What went wrong?This usually happens if you didn’t chill it long enough. Or, you might have used instant pudding mix wrong (like using milk that wasn’t cold or not whisking long enough). Also, changing ingredients can stop it from setting. Make sure you follow the steps and chilling times exactly.
Conclusion
As we’ve explored these three delightful options, it’s clear that no-bake pies offer a fantastic solution for satisfying your sweet tooth with minimal fuss. The Oreo, Coconut Cream, and Peanut Butter pies featured here are perfect examples of how simple ingredients and straightforward techniques can yield truly spectacular results. They eliminate the need for oven time, making them ideal for keeping your kitchen cool, especially during warmer months or when your oven is already busy with other dishes. Furthermore, the quick preparation times mean you can whip up a delicious dessert in mere minutes, leaving more time to enjoy with family and friends.
Beyond their convenience, the real magic of these no-bake pies lies in their incredible flavor and creamy textures. The rich, chocolatey depth of the Oreo pie, the light and tropical escape offered by the Coconut Cream pie, and the comforting, nutty sweetness of the Peanut Butter pie each provide a unique and satisfying experience. Whether you’re a die-hard chocolate fan, a lover of all things coconut, or someone who can’t get enough peanut butter, there’s a flavor here to capture your heart (and your taste buds!).
These recipes are also wonderfully forgiving and perfect for involving others in the kitchen, including children. The simple steps, like crushing cookies, mixing fillings, and spreading toppings, are fun and easy for helpers of all ages. Moreover, the required chilling time makes them excellent candidates for making ahead, reducing stress when you’re hosting or preparing for a holiday gathering. Simply assemble the pie, pop it in the fridge, and it’s ready to impress when dessert time arrives.
We encourage you to choose your favorite flavor, gather your ingredients, and give one (or all three!) of these must-try no-bake pie recipes a whirl. Experience the joy of creating a delicious, beautiful dessert without ever turning on your oven. They are guaranteed crowd-pleasers that will bring smiles to everyone’s faces. Once you’ve made one, we’d love to hear about your experience! Share your photos and let us know which flavor was your favorite in the comments below.
More Delicious Dessert Recipes
If you love sweets, check out more great dessert recipes on Galmof.com!
For more pie and cheesecake ideas, look at our Cheesecake Stuffed Baked Apples, No-Bake Strawberry Crunch Cheesecake, Reeses Chocolate Peanut Butter Cup Cheesecake. Also, see our guides on Mastering the Art of Berry Crumble and Easy Apple Crisp.
If you enjoy chocolate and peanut butter together, try our Peanut Butter Chocolate Cheesecake, MMs Peanut Butter Cake, No-Bake Chocolate Peanut Butter Caramel Bars, or our Triple Chocolate Cookies and Cream Layer Cake.
Find other creamy and sweet treats like our Creamy Cake Recipes, Classic Cream Puffs Recipe, Buko Pandan Jelly Drink,
Happy cooking 😋